Do you have a water leak? Leaking toilets cause more water waste than any other fixture in the home.
Even a silent toilet leak (that’s one you normally can’t hear) will waste from 30 to 500 gallons of water per day!

The ones you can hear will waste much, much more. Such wastage can normally be attributed to a faulty water level adjustment or to a leaky flapper.
Leaky flappers and the “dye test”
Most people will say their toilet does not leak. There is one sure way to find out. Put some food dye in the tank and then leave for 15 minutes. When you return, look into your bowl to see if there is now dye color in the water spot. If there is color, or if you already can hear and or see water running in your bowl, it’s time for a new flapper!
Deformed flapper valves are often the result of toilet tank cleaning products.
If you choose to change the flapper yourself, the best bet is to remove your old flapper and take it with you to purchase a new one. Removing the old flapper is easy but can be messy if it is partially disintegrated. A pair of cheap latex gloves and a small container to hold the old flapper will make your job less of a hardship.
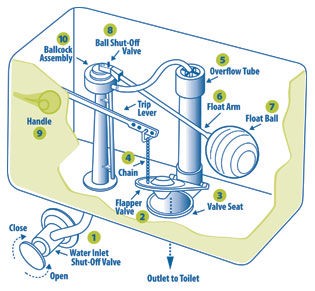
When removing your old flapper, you will first need to turn the water off at the shut-off/supply valve. Next, disconnect the chain or tail from the trip lever arm and then slip the ears of the flapper off of the trunion ears. You will need to select a new flapper that, as near as possible, matches your old one. If your flapper is one of the hard-to-find ones, you may even need to contact the manufacturer of your toilet for a recommendation, so if you only have one toilet, it’s a good idea to keep the old flapper handy until you’ve found a suitable replacement.
While the flapper is out, take your finger and move it over the seating surface of the flush valve seat — that’s the part that the flapper sets on to seal the water. If the surface is rough, this needs to be fixed, too. If the flush valve is plastic, it will need to be replaced. This can be a bigger job and will probably require a plumber (see the next paragraph and evaluate whether you want to tackle it yourself). If the flush valve is brass, you may be able to fix it yourself. Get some 400 grit wet or dry sandpaper and lightly go over the entire surface. Repeat the process until the surface is smooth. For toilets with a flat seal type of flapper, simply slip it off the piston or other holding device and replace it with a new one.
After installing the new flapper, run the dye test again to assure you have no leak. If the leak persists (and every now and then it will), you are probably going to have to replace the entire flush valve. To do this, you will need to turn your water off and disconnect the supply line. Then loosen the bolts that hold the tank to the bowl, remove the tank to bowl seal and remove the flange nut on the bottom side of the tank which holds the flush valve in place. Next purchase a replacement valve assembly, but be sure that the new assembly has an overflow tube at least as tall as the old one. If the new one is taller, then note the correct height from the old one, mark that height on the new one and, using a hack saw, cut it to the proper length. Using new seals, reassemble in the reverse order as used in removing the old valve.
“It only runs in the middle of the night”
Many toilets really do run only at night; that’s because people use much less water during these hours and in many municipal water systems, the water pressure rises considerably during this time. It is not uncommon for system water pressure to rise by 15 to 20 pounds per square inch (psi), and by as much as 30 psi in some situations. This rise in pressure could cause “water creep” inside your gravity fed tank by 1/2 inch or more. That is why the manufacturers of toilets normally suggest that the water level to be set at approximately one inch below the top of the overflow tube.
Water Level in the tank
If you only notice your toilet running in the middle of the night, there is a good chance that the water level in your tank is set too high. Remove your tank lid and observe the water level. If you are doing this in the middle of the night (which, by the way, would be the ideal time to check this out!), and the water is running over the top of the overflow tube, adjust it down using the adjusting screw on the top of the fill valve mechanism (turn clockwise) or the “V” shaped clip on the stiff wire link (slide it down) on the “sliding float” so it’s not overflowing. Then, the following day, make another adjustment down to the one-inch level.
